Add Watermark 3.2 released

What’s new in version 3.2:

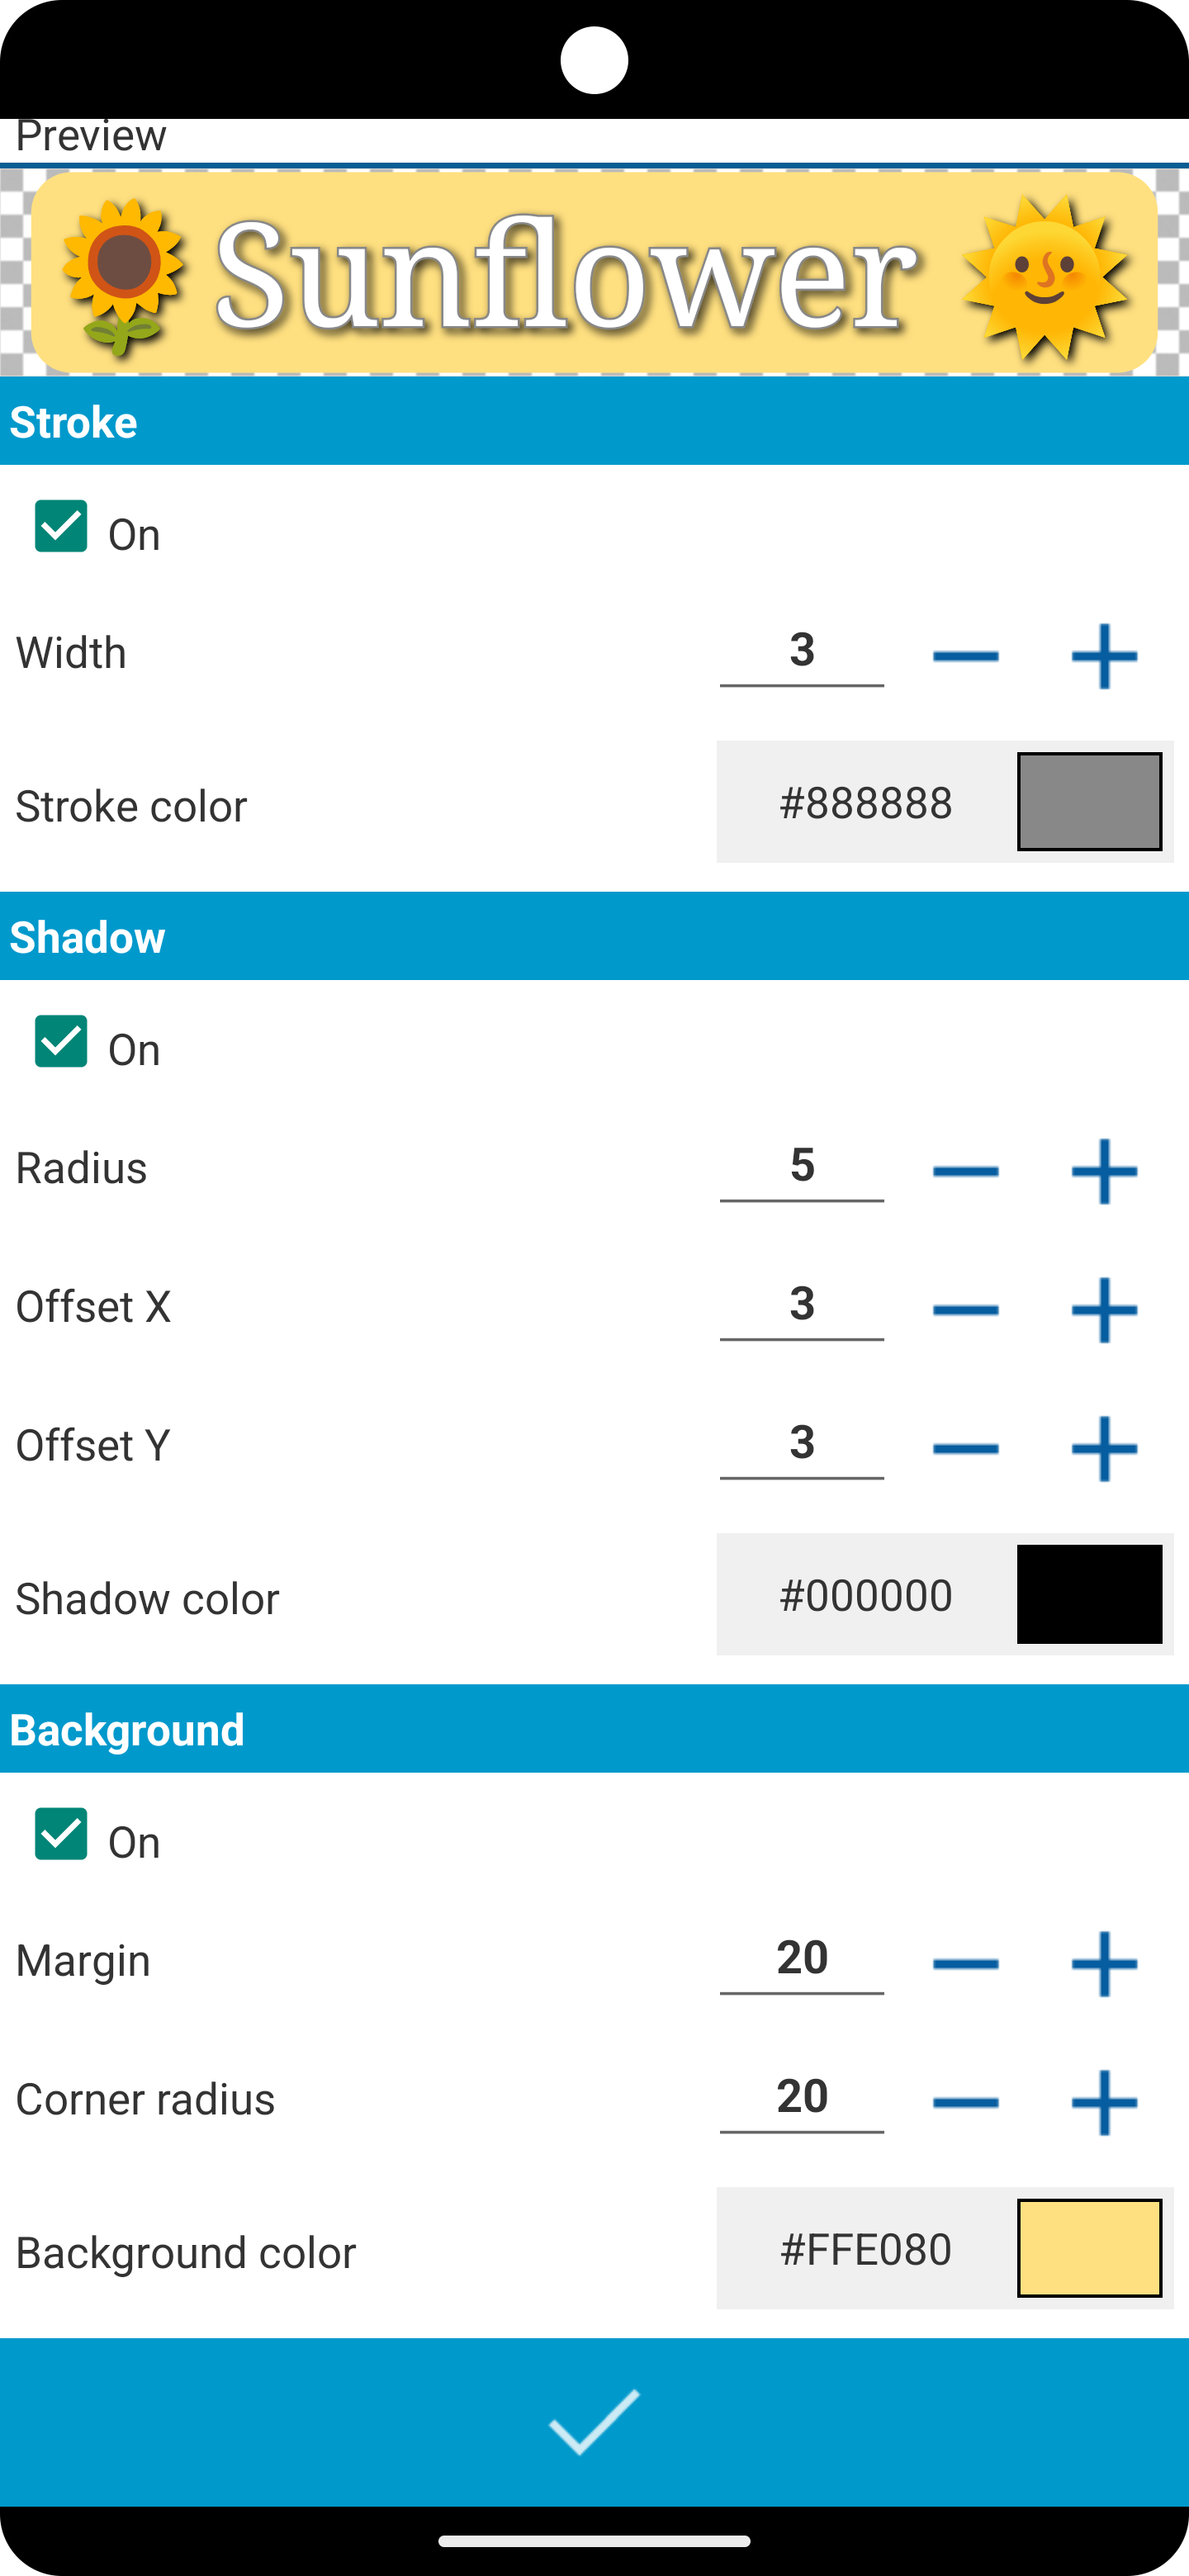
  • New: Background behind text watermark with adjustable color, margin and rounded corners (see Settings)
  • Bug fix: Images didn’t appear in the Gallery after processing on some devices with Android 9 (API 28)
  • A lot of small improvements

How to apply a solid background to a watermark text:

  1. Go to Watermark text settings.
  2. Edit your text.
  3. Set Background to On and adjust Margin and Corner radius.
    These values are relative to the text size and can be from 0% to 50%.
    That means, for 50% margin the full background height equals 200% of the text height.

🌻 By the way, did you know, that you can also use any smiley available in your Android keyboard? Just switch to the smiley-tab when editing your watermark text.

Add Watermark: How To Reuse Recent Watermarks (Profiles)

Since the new version 3.0 you can easy recall up to 20 recently used watermarks with all their properties. Like using profiles to quick switch between many predefined settings. How this works:

Each time you save resulting image the app stores all watermark settings in the list “Recent texts” or “Recent images” depending on the current watermark type.

To reuse one of last used watermarks please follow the steps:

  • Open Settings (pressing edit or gear button)
  • Go to Text or Image settings depending on your need
  • Press button “Recent texts” or “Recent images”
  • Choose an entry from the list
  • You can see immediately the loaded settings
  • Close Settings (pressing the back button) to see how the watermark looks on the preview
  • Now you can save the resulting image

screenshot_2016-12-19-12-33-33    screenshot_2016-12-19-12-34-06    screenshot_2016-12-19-12-34-57

Tips:

Please don’t forget: as a confirmation you need to save your resulting image to make sure your new/changed watermark’s properties can be recalled from the recent list.

If you apply changes to a recent watermark, they will be updated while saving resulting image until you change the watermark content itself (text or watermark file name). Then it will be saved under a new name.

After a new installation the list “Recent texts” already contains a preloaded set of watermark samples. Try them out!

The earlier watermarks (>20) will be replaced with last ones. Last saved comes always up in the list.

List of “Recent images” saves both types of image watermarks: built-in stickers and user’s custom logos.

Add Watermark: How To Use Built-in Stickers

Since version 3.0 there is a set of built-in watermark images (stickers) you can use for your images. Also in the free version!

To add a such sticker just:

  • Open Settings (pressing gear button )
  • Go to Image settings
  • Make sure the watermark type is set to “Image”
  • Press button “Biult-in stickers”
  • Choose one image from the list
  • Close Settings (pressing the back button)
  • On the preview adjust opacity, position and rotation
  • Now you can save the resulting image

screenshot_2016-12-19-12-34-57    screenshot_2016-12-19-12-35-07    screenshot_2016-12-19-12-35-27Screenshot_2016-12-19-12-49-29.png

When you are missing some special stickers please let me know!

Add Watermark: How To Process Multiple Images From Dropbox

When you are storing your images in Dropbox cloud, you may be wondering, how to watermark more than one image using batch mode. Because currently in Dropbox you can select only one single file to send it to another app.

Please find below a workaround. To say it short, you need first to download images to device.

1. Start Dropbox and mark needed images, then save them to device (use three point menu > save to device):

Inline image 1
2. When they are saved (you can see the status on icons), open Add Watermark, select source (+) > process multiple images
3. Navigate to the Dropbox folder – it looks similar to
/sdcard/Android/data/com.dropbox.and.android/files/XXXXXXX/scratch…,
select all images, then process them.
I don’t recommend to process more than 100 images at once, as it can take very long time (few minutes).
Inline image 2