Add Watermark: How To Process Multiple Images From Dropbox

When you are storing your images in Dropbox cloud, you may be wondering, how to watermark more than one image using batch mode. Because currently in Dropbox you can select only one single file to send it to another app.

Please find below a workaround. To say it short, you need first to download images to device.

1. Start Dropbox and mark needed images, then save them to device (use three point menu > save to device):

Inline image 1
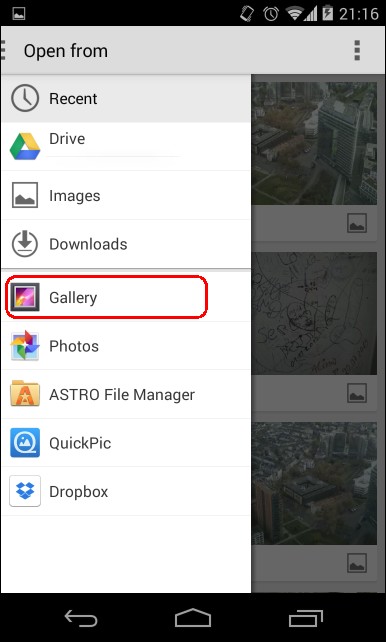
2. When they are saved (you can see the status on icons), open Add Watermark, select source (+) > process multiple images
3. Navigate to the Dropbox folder – it looks similar to
/sdcard/Android/data/com.dropbox.and.android/files/XXXXXXX/scratch…,
select all images, then process them.
I don’t recommend to process more than 100 images at once, as it can take very long time (few minutes).
Inline image 2

Add Watermark 2.9.5 released

Changes in version 2.9.5:

  • New placeholders %day-dd%, %month-mm%, %month-long%, %year% for flexible date stamping, for example: “01 January 2015” or “2015-01-01”
  • Fixed error for placeholder %date-ensfx%: 11th, 12th, 13th appearing correctly yet
  • Fixed font problem: some fonts stopped working after update to Android Lollipop
  • Added 6 new fonts with cyrillic support (Avdira, DejaVu Serif, Resagokr, UKIJ Kufi Yay, UKIJ Qolyazma, Yiggivoo), font list rearranged

Add Watermark 2.9.4 released

Changes in version 2.9.4:

  • Fixed error: “Image not found” after using built-in camera on some devices
  • New placeholder %date-ensfx% for date format like “1th January 2000”
  • New setting to disable confirmation while auto processing
  • New option to flip the watermark image horizontally or vertically
  • Quick insert of frequently used special symbols like “©” etc.
  • Added Dutch translation. Many thanks to MarcyArtistic!
  • Added Czech translation. Many thanks to Renek!

Add Watermark 2.9 released

Changes in version 2.9:

  • Increased max size of watermarked images in free version from 800 to 1024 px
  • Improved support for Android KitKat. Anyway, since KitKat it’s impossible to save images on the external removable storage.
    Please use the internal memory instead!
  • Design improvements
  • Added turkish translation. Many thanks to ene49 (CepTeam)!
  • Some bug fixes


Add Watermark: How to use your own fonts for text watermark

Since version 2.8.6 you can import up to 20 TrueType or OpenType fonts to the app (only 1 custom font in the free version).

Just copy your font files (extension .ttf or .otf) to the folder “addwatermark/custom_fonts” on your device. This folder is automatically created after app installation.

Screenshot_2013-07-08_20-31-07

When you start Add Watermark, you can see now the custom fonts (Settings / Text / Font), added to the build-in fonts starting with numbers [1]..[20]:

Screenshot_2013-07-08-20-18-54

Please note, if you can’t see a custom font in the app, the file might have a wrong format or is corrupted.

Add Watermark 2.8.6 released

Changes in version 2.8.6:

  • Now you can use your own fonts!
    Import up to 20 TrueType or OpenType fonts to folder “addwatermark/custom_fonts” on your device
    (only 1 custom font in the free version).
  • Added new font OtfPoc.
  • Bug fix: blank white preview area when loaded image’s width equals screen width.

Add Watermark 2.8 released

Changes in version 2.8:

  • Select and process multiple images directly in the app (batch mode)
  • Easy reusing of recent watermark texts (see Settings / Text / Recent texts…)
  • Fixed known EXIF issues (corrupted tags, wrong creating date), more tags are supported
  • New dialogue “Image details” (opens when touching file name or sizу
  • Added new placeholders (%shutter%, %iso%, %aperture% etc.)
  • More stable when saving due to automatic performance optimization, displaying progress dialog
  • Some bug fixes

Open dialog    Picture Browser

Settings / Text / Recent texts    List of Recent texts

Dialog - Image details

Add Watermark 2.5 released

Changes in version 2.5:

  • Share your images much easier: sharing action works now in auto mode for single and multiple images (batch-mode)!
    How to use:
    Open “Settings/General”, enable “Quick share after saving”, enable “Add watermark fully automatically”, adjust Watermark then quit the app. From Gallery or another image viewer select all images you want to process, select “Share/Add Watermark”. After processing you see the dialog “Share image via”, select an app. Done!
  • Tag your photos with GPS coordinates: use GPS latitude and longitude placeholders for text watermark (if available in EXIF-data, see settings/general)Recently added placeholders:
    %dirpath% – Directory path (full path without file name)
    %dirname% – Directory name  only (without full path)
    %lat% – GPS latitude in decimal degrees positive or negative, like 9.446388 (if available in EXIF-data)
    %lat-dms% – GPS latitude in degrees-minutes-seconds, north or south, like 9°26’47”N
    %lon% – GPS longitude in decimal degrees, positive or negative, like -7.976666
    %lon-dms%– GPS longitude in degrees-minutes-seconds, east or west, like 7°58’36”WFull list of placeholders:        
  • Added 6 new fonts:

Add Watermark 2.4 released

Changes in version 2.4:

  • Saved image now gets existing EXIF data from source image, inclusive exposure, camera, GPS data etc. (see Settings / General);
  • More placeholders for text watermark, multiple parameters can be combined, i.e. :
    Time: %time-12%, Size: %width%x%height%
    (see Settings / Text).

See placeholder samples:

Example 1
Text used in example: “%date-iso%   %time-hm-24%

Example 2
Text used in example: “Taken with %camera%   File: %filename%

Add Watermark: How to quick share a watermarked photo on Facebook

With Add Watermark you can quick upload an image to a popular social service like Facebook, Twitter, Flickr etc. and share it with your friends.

You don’t need to enter your login data directly in Add Watermark, but you need to have an app of your social service installed on your device. The most of these services have an official app for Android.

For example, for Facebook follow the steps:

1. If not already installed, install the official Facebook for Android from Google Play and make sure that you are logged in.

2. Start Add Watermark and load an existing image or take a new photo, adjust the watermark.

3. Press “Save” button, in Save Dialog select “Action when done” > “Share image”, press “Save”.


4. In the list “Share image via” select your Facebook app, you’ll see a new post with the image. Add a comment, choose audience and press “Post”.


Your image is now in your Facebook-timeline:

Watch “How To” video: